


The second patch of the RED update has been released! This one includes the new job, Zero, as well as the Mirror World and the Maple Auction system~ I’m excited to play as Zero because it’s very story line based!
Events and Cash updates have been added!
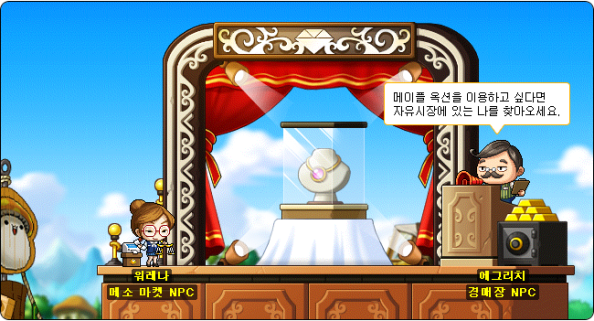
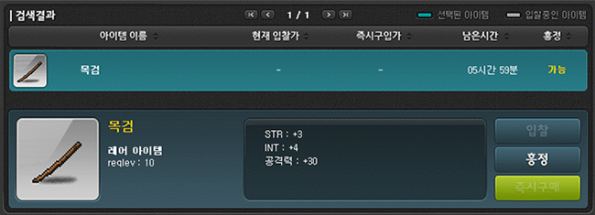
To make trading items faster and easier in MapleStory, the Maple Auction has been added! You can enter by talking to Eggrich in the Free Market entrance.

The Maple Auction window looks like this, with 4 tabs.
- Search: you can search and purchase items being sold by others.
- Sell: you can list and unlist items that you have put up for sale.
- Bid: you can see all the items you are bidding on.
- Complete: you can see your completed or outbid trades.

In the bid/complete tabs, you can sort the items by pressing the arrow. You can see the items from the last week.
Each day, you can search the Auctions up to 5 times per day. Every 10 minutes, your Search Count will be charged by 1 (up to a max of 5 per day). If you don’t have any Search Counts, you can pay mesos to immediately charge it.
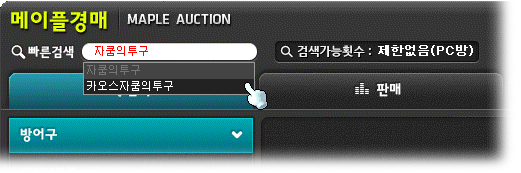
Quick search will show you items that are near what you are searching for.
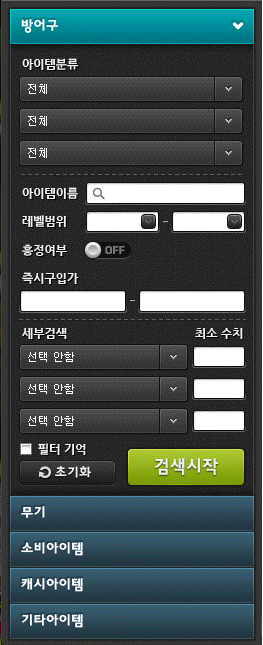
In the search window on the side, you can choose between armor, weapons, use items, Cash items, or etc items. If you choose armor or weapons, you can choose specific things to search for such as:
- Item name
- Level range
- Price
- Various stats

To sell items, you can just drag and drop it into the side. You will then be able to choose the instant bought price, duration of the auction, and whether or not you wish for it to be an ‘actual auction’ (like with negotiations) or not.

You can cancel the sale of equipment only if its within 5 minutes of putting the item up or if there are no bids on the item by pressing the X button.

When searching for items to buy, if it is not an ‘auction’, you can pay the price the seller has set to buy it automatically or bid on the item.
The number on the left is the current bid and the number on the right is the instant buy price. The number beside that is how long the auction will last.
If the seller has set it as an ‘offer’ item, you can click the button to give him an offer on his item. The other offers given by other Maplers will not be shown on the UI for this type of sale.

The seller will then have to accept or decline your offer when they are online. They will receive a message that alerts them of bids on their items.

When you give an offer or a seller refuses your offer, both parties can send messages to the other through the auction system to make it easier to come to a price.
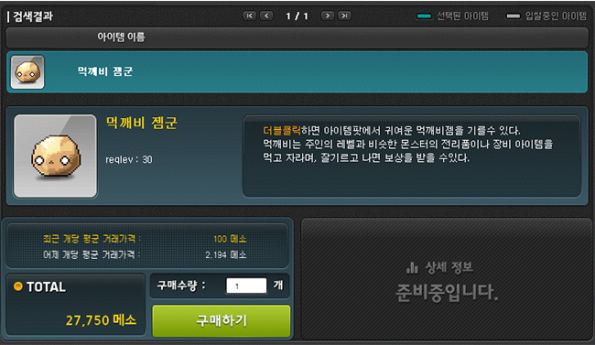
For use/etc items, you cannot see specific listings. You can only choose to buy a specific amount of the item and then it will sell to you at the average price (I assume it will take it from various peoples’ auctions).
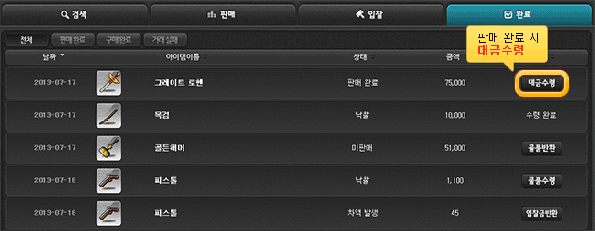
In the completed tab, you can receive your failed auction items, instantly bought items, successful auction items, and mesos.
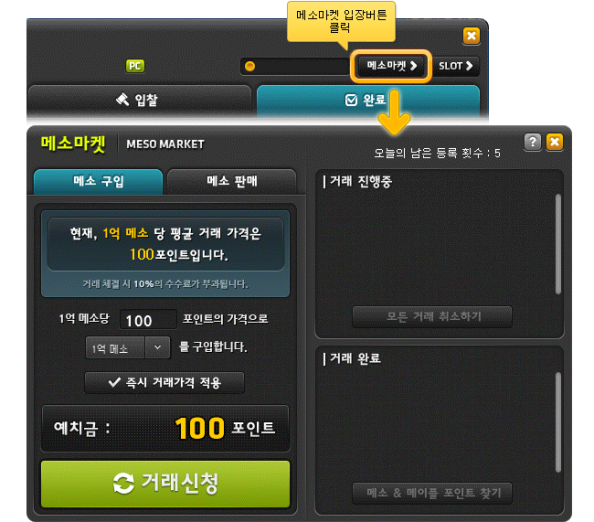
The Meso Market (where you can buy and sell Maple Points for mesos) has been moved. It can now be accessed through the Auction window, in the top right.

By pressing the Slot button in the top right corner, you can see how many buying/selling slots you have left. All users, by default, have access to 3 selling slots and 5 buying slots. You cannot buy or sell any more items than those at one time.
Premium PC Room users will have bonus slots available to them.

While playing MapleStory, you will receive real time messages on the top of your screen for things such as offers on your items.
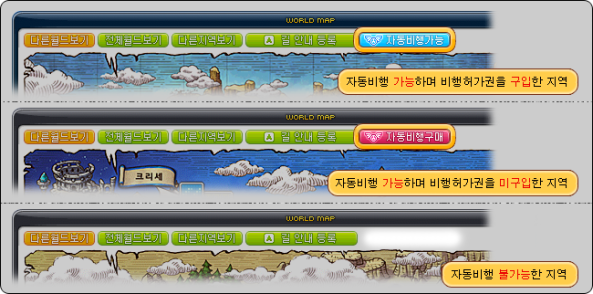
The Smart Riding system has been updated! Now, on world maps, you will be able to see a button on the top row. A blue button means you can use Autopilot Riding, a red button means you can if you buy a license, and no button means you cannot.
Smart Riding has also been expanded to work in Aqua Road, Ludus Lake, and Minar Forest.

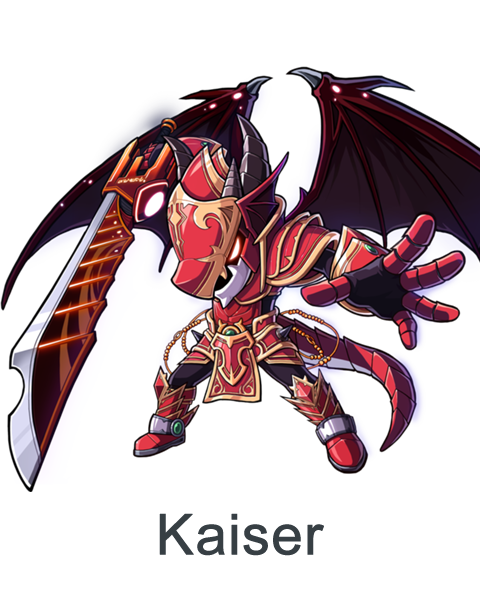
Let’s move on to what you guys really wanna know about, Zero! Zero is a ‘Child of God’ class and begins at level 100.

When you create one, you cannot choose any customized appearance, Zero Alpha and Beta will be completely set.

The Shadow Knight’s youngest member, Zero. Until now, he has thought his fate was to defeat the monsters coming from the Shadow Temple.
However, accidentally Zero enters the Temple, and instead of monsters he sees a girl. At that moment, they resonate and reveal the true power of time within them!
After completing the tutorial, you will automatically be given base equipment, 2 weapons, and 4 rings.
There’s actually like three videos used for Zero’s tutorial, one which you’ve probably seen before.
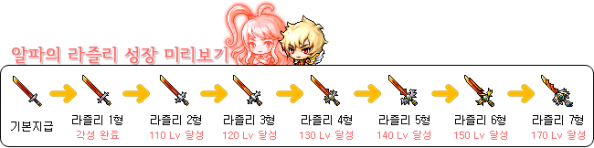
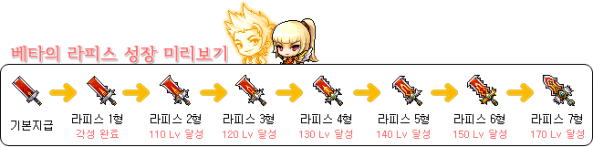
Zero uses the holy weapons, Lapis and Lazuli! Alpha’s Lazuli is a Tachi and Beta’s Lapis is a Great Sword.
As Zero grows, the weapons will grow as well, upgrading every 10 levels from 100 to 170.

Since you equip both Zero Alpha and Beta with one set of equipment (no gender-specific equipment allowed!), the Tachi and Great Sword will swap places as the main and secondary weapon as you Tag between Alpha and Beta.
To go more in depth, you can only wear unisex GAME items. For your Cash equipment, there will be a different inventory for both Alpha and Beta, meaning you can wear gender specific Cash items.

When fighting monsters in the Mirror World, each monster defeated will give you one Weapon Point (in the form of those red orbs).
Weapon Points can be used to upgrade Lapis and Lazuli!
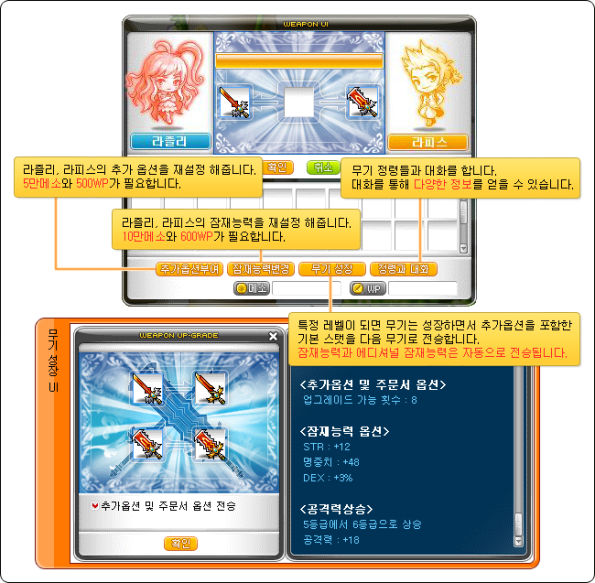
After completing chapter 1 of the main story quests (where you meet Lapis and Lazuli), you can press the Weapon button in your equipment inventory to open the Weapon UI.
When upgrading Lapis and Lazuli, one scroll will apply to both weapons at the same time. In addition, you can spend 50k mesos and 500WP to reset their additional options or 100k mesos and 600 WP to reset their potential. Again, both items will have the same additional options and potential (so basically the potential from your weapon is doubled).
You can also choose to upgrade them (when your level is high enough) to their next upgrade, while choosing if you want to keep their additional options/scrolled stats or not.
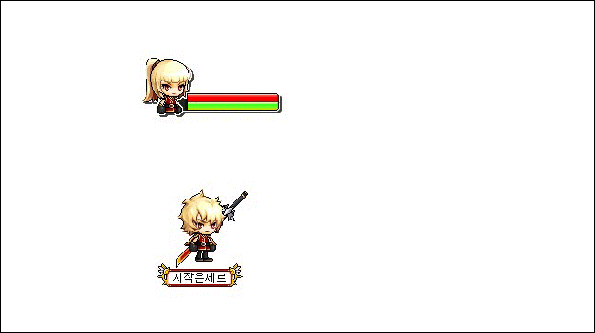
Zero is very unique in that you control not one but two characters. With the Tag system, you can switch between Alpha and Beta in real-time! You can do this by pressing the keys of one of the inactive character’s skills.
The inactive character’s HP and TF will be shown in a smaller UI while the active character will be shown on the regular character UI.
While tagged out, the inactive character’s HP and TF recovery rate will become extremely fast.

The character that was tagged out will not disappear immediately, but for a short period of time, the Assist system will take place! For every skill that you use, the inactive Zero will use the corresponding skill as well, allowing you to do interesting double attacks.

Zero also uses the Combination system. Using one attacking skill in succession will automatically active the Combination skills.
In your skill inventory, skills with a green ribbon are Combination skills.
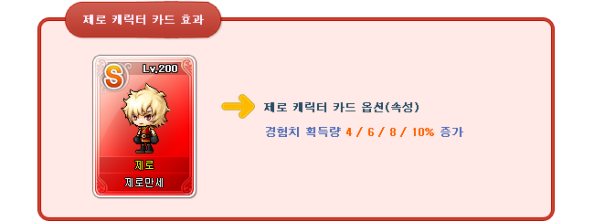
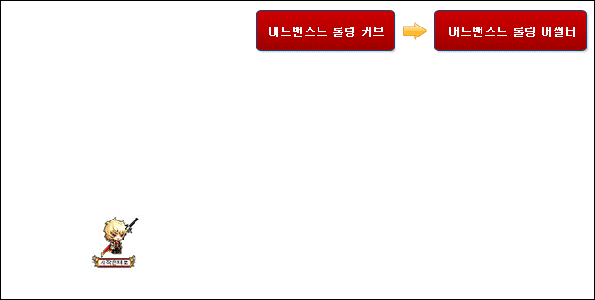
Zero’s character card gives 4/6/8/10% bonus experience. The levels for each rank are 110, 130, 160, and 200.
Skills

Beginner
Both Alpha and Beta uses these skills. They are received upon creation and some can be levelled up by completing Zero’s story quests.

 Retrace Temple: Consume 10 Time Force and return to Zero’s temple. There is a cooldown of 30 seconds.
 Dual Combat: Zero’s special battle style. [Tag] Use the inactive Zero’s skills to switch out. There is a cooldown of 3 seconds. [Assist] After Tagging, for 3 seconds your attacking skills will be supported by Zero’s Assist skills.

 Divine Force: Your Transcendent’s power consumes 20 Time Force and increases nearby party members’ attack and magic attack by 20, defense and magic defense by 500, and resistance to elements and statuses by 10%. Using this skill again will turn off its effects. This skill cannot be used at the same time as Divine Swift.

 Divine Swift: Your Transcendent’s power consumes 20 Time Force and increases nearby party members’ attacking speed by 1 stage, speed by 20, jump by 10 and avoid and accuracy by 300. Using this skill again will turn off its effects. This skill cannot be used at the same time as Divine Force.

 Burst Jump: Accelerate time while jumping, consuming 5 Time Force to jump once more.

 Burst Step: Instantaneously accelerate time, allowing yourself to move quickly in one direction by consuming 5 Time Force and using this skill along with an arrow key or double tapping an arrow key.

 Rhinne’s Protection: The Goddess Rhinne protects you and your party members, consuming 10 Time Force and increasing all of their stats by 15%.
 Resolve Time: Receive the Goddess Rhinne’s powers, permanently increasing your damage by 30%, strength by 50, HP by 15% and your maximum speed by 20. This skill can be levelled up by collecting the Goddess’ tears. (max level: 5)
 Rhinne’s Blessing: The blessings of the Goddess Rhinne decreases damage taken from monsters by 15% and allows you to ignore 10% of their defenses. This skill can be levelled up by collecting the Goddess’ tears. (Link Skill) (max level: 5)

Transcendent
As you level up, your Transcendent’s powers become stronger, giving you access to new skills.


 Rapid Time: Whenever you attack enemies, control time and reduce all attacking skills’ cooldowns by 4 seconds. [Detect] Alpha’s attacks increase your critical rate by 3% for 20 seconds, stacking up to 10 times. [Strength] Beta’s attacks increase your damage by 1% for 20 seconds, stacking up to 10 times. [Detect&Strength] Both effects are used while Tag is active. (required level: 100)

 Time Distortion: Your Transcendent’s power allows you to consume 30 Time Force and create an area in which you can control time for 40 seconds. Enemies within the area will have damage taken increased by 25% and their buffs removed every 4 seconds. Party members within the area will have any status effects removed every 4 seconds. There is a cooldown of 120 seconds. (required level: 110)

 Time Holding: Control time, consuming 10 Time Force and resetting all of your skill cooldowns as well as causing yourself to become invincibresle for 15 seconds, removing any Time Force costs from skills. There is a cooldown of 180 seconds. (required level: 120)

 Time Rewind: Preserve your current time within an hourglass while consuming 10 Time Force. If you die while this buff is active, the buff will be consumed and you will be revived at full HP. There is a cooldown of 600 seconds. (required level: 140)

 Shadow Rain: Alpha and Beta’s special joint move. Beta’s Great Sword rains down on up to 15 enemies, dealing 1800% 7 times. Alpha will attack from the shadows, dealing an additional 1800% damage 7 times. There is a cooldown of 300 seconds. (required level: 170)
 Intensive Time: The Transcendent’s strength increases all nearby users’ attack and magic attack. (required level: 200)

Zero Alpha
Alpha specializes in high attack speed, critical attacks, and moving while attacking. As you level up, more skills will be available to you.
 Tachi Mastery: Passively increase Alpha’s mastery over the Tachi to 70%. In addition, when using the Tachi, increase his attack by 50, speed by 30, jump by 20, defense ignored by 50%, and attacking speed by 3 stages. This skill will automatically be level 8 when created. (max level: 10)

 Combat Recovery: Permanently increase Alpha’s Time Force recovery by 30%. In addition, when attacking enemies, there will be a 25% chance to recover 10 Time Force. (required level: 110) (max level: 20)
 Reinforce Body: Enhance Alpha’s body, permanently increasing his maximum HP by 30%, maximum Time Force by 30%, and critical chance by 40%. (required level: 130) (max level: 20)

 Divine Leer: Passively increase Alpha’s minimum and maximum critical damage by 50%. In addition, when attacking, there is a 15% chance to make the enemy bleed for 15 seconds, dealing 200% every second while healing Alpha for 10% of his health. (required level: 160) (max level: 20)
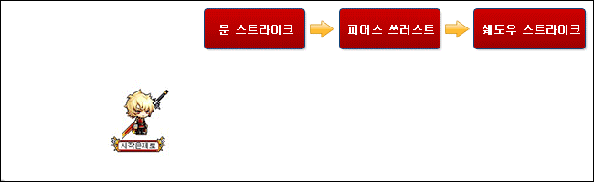
Combination 1: Moon Strike → Pierce Thrust → Shadow Strike

 Moon Strike: Attack up to 8 enemies in front of you, consuming 3 Time Force and dealing 180% damage 4 times while pulling them towards you. Combination skill: Pierce Thrust. Assist skill: Upper Slash. (max level: 10)

 Pierce Thrust: Stab your Tachi’s sharp point into up to 8 enemies in front of you, consuming 5 Time Force and dealing 250% damage 4 times. [Activation Command] After using Moon Strike, press Moon Strike once again. Combination skill: Shadow Strike. Assist skill: Advanced Power Stomp. (required skill: level 1 Moon Strike) (max level: 10)


 Shadow Strike: Quickly move forward to the nearest enemy, consuming 8 Time Force and dealing 310% damage 5 times on up to 8 enemies. Afterwards, shoot a blade that pierces through up to 8 enemies, dealing 310% damage 1 time. [Activation Command] After using Pierce Thrust, press Moon Strike. Assist skill: Upper Slash. (required skill: level 1 Pierce Thrust) (max level: 10)

Combination 2: Flash Assaulter → Spin Cutter, Advanced Spin Cutter

 Flash Assaulter: Instantly move forward, consuming 9 Time Force and dealing 360% damage 4 times on up to 8 enemies that you pass through. There is a cooldown of 5 seconds. Combination skill: Advanced Spin Cutter. Assist skill: Front Slash. (required level: 110) (max level: 10)

 Spin Cutter: Attack up to 8 surrounding enemies as you quickly spin around, consuming 11 Time Force and dealing 420% damage 4 times. [Activation Command] After using Flash Assaulter, press Flash Assaulter once more. Assist skill: Advanced Throwing Weapon. (required level: 115) (required skill: level 1 Flash Assaulter) (max level: 10)


 Advanced Spin Cutter: Enhance Spin Cutter, increasing its damage to 560% 5 times and allowing it to shoot blades on both sides of you that pierce through up to 8 enemies and deal 560% damage. Assist skill: Advanced Throwing Weapon. (required level: 150) (required skill: level 10 Spin Cutter) (max level: 20)
Combination 3: Rolling Curve, Advanced Rolling Curve → Rolling Assaulter, Advanced Rolling Assaulter

 Rolling Curve: Spin your body extremely fast, moving forwards and upwards while consuming 13 Time Force and attacking up to 8 enemies for 610% damage 5 times. There is a cooldown of 10 seconds. Combination skill: Advanced Rolling Assaulter. Assist skill: Turning Drive. (required level: 120) (max level: 20)


 Advanced Rolling Curve: Enhance Rolling Curve, increasing its damage to 760% 6 times and allowing it to shoot 3 blades that pierce up to 8 nearby enemies dealing 760% damage. Combination skill: Advanced Rolling Assaulter. Assist Skill: Turning Drive. (required level: 160) (required skill: level 20 Rolling Curve) (max level: 30)

 Rolling Assaulter: Quickly spin forwards, consuming 15 Time Force while pushing up to 8 enemies and dealing 650% damage 5 times. [Activation Command] After using Rolling Curve, press Rolling Curve once more. Assist skill: Advanced Whirl Wind. (required level: 130) (required skill: level 1 Rolling Curve) (max level: 20)

 Advanced Rolling Assaulter: Enhance Rolling Assaulter, increasing its damage to 800% 6 times and allowing it to shoot 3 blades using the three arrow keys ←↑→, piercing through up to 8 enemies dealing 800% damage. Assist skill: Advanced Whirl Wind. (required level: 170) (required skill: level 20 Rolling Assaulter) (max level: 30)
Combination 4: Wind Cutter → Wind Strike → Storm Break, Advanced Storm Break


 Wind Cutter: Attack up to 8 enemies in front of you, consuming 17 Time Force and dealing 350% damage 4 times. At their location, create a vortex that deals 350% damage 2 times on up to 8 enemies every second for 3 seconds. There is a cooldown of 15 seconds. Combination skill: Wind Strike. Assist skill: Giga Crash. (required level: 140) (max level: 10)

 Wind Strike: Shoot the vortex created by Wind Cutter forwards, consuming 20 Time Force and dealing 450% damage 4 times on up to 8 enemies. [Activation Command] After using Wind Cutter, press Wind Cutter once more. Combination skill: Advanced Storm Break. Assist skill: Jumping Crash. (required level: 145) (required skill: level 1 Wind Cutter) (max level: 10)


 Storm Break: Attack up to 8 enemies in front of you, consuming 25 Time Force and dealing 510% damage 4 times. Afterwards, create a vortex and shoot it forwards, dealing 510% damage 2 times every second for 3 seconds. [Activation Command] After using Wind Strike, press Wind Cutter. Assist skill: Advanced Earth Break. (required level: 150) (required skill: level 1 Wind Strike) (max level: 20)


 Advanced Storm Break: Enhance Storm Break, increasing its damage to 720% 5 times with a 10% chance of instant death. In addition, the vortex’s damage will be increased to 720% and an electric field will be created in its path, dealing 270% damage on up to 8 enemies every second for 3 seconds. Assist skill: Advanced Earth Break. (required level: 180) (required skill: level 20 Storm Break) (max level: 30)

Zero Beta
Beta has high damaging one shot skills and solid defenses. As you level up, more skills will be available to you.
 Great Sword Mastery: Passively increase Beta’s mastery over the Great Sword to 70% as well has her attack by 100, damage to bosses by 50%, and attacking speed by 2 stages. In addition, when attacking with the Great Sword, increase Beta’s damage by 15% for each target less than the maximum number of enemies hit. This skill will automatically be level 8 when created. (max level: 10)
 Solid Body: Enhance Beta’s body, permanently increasing her defense and magic defense by 2000, resistance to statuses and elements by 50%, and Stance by 100%. (required level: 110) (max level: 20)

 Armor Split: Increase the power of the Great Sword, allowing Beta’s attacks to have a 20% chance to split enemies’ armor, reducing their defenses by 10% for 20 seconds (stacks up to 5 times). (required level: 130) (max level: 20)

 Immune Barrier: When Beta is attacked, there is a 25% chance to create a shield that absorbs damage equal to 50% of her maximum HP for 15 seconds. The shield will not absorb damage done by the attack that created the shield. (required level: 165) (max level: 20)

 Critical Bind: When Beta attacks enemies, there is a 10% chance to stop time and bind their movements for 5 seconds. Enemies affected will bleed, increasing Alpha’s critical rate against them by 30%. Bleeding enemies will be immune to Critical Bind for 15 seconds after the effect expires. (required level: 185) (max level: 20)
Combination 1: Upper Slash → Power Stomp, Advanced Power Stomp

 Upper Slash: Attack up to 6 enemies in front of you, consuming 3 Time Force while dealing 630% damage 2 times and pushing them into the air. Combination skill: Advanced Power Stomp. Assist skill: Moon Strike. (max level: 10)

 Power Stomp: Attack up to 6 enemies in front of you, consuming 5 Time Force while dealing 680% damage 2 times. In addition, enemies in the air will be pushed to the ground. [Activation Command] After using Upper Slash, press Upper Slash once more.Assist skill: Pierce Thrust. (required skill: level 1 Upper Slash) (max level: 10)


 Advanced Power Stomp: Enhance Power Stomp, increasing its damage to 980% 3 times. In addition, it will create a shockwave when hitting enemies into the ground, dealing 980% damage 3 times on up to 6 enemies with a 100% chance to stun for 3 seconds. Assist skill: Pierce Thrust. (required level: 150) (required skill: level 10 Power Stomp) (max level: 20)
Combination 2: Front Slash → Throwing Weapon, Advanced Throwing Weapon

 Front Slash: Thrust the Great Sword forward, consuming 8 Time Force and dealing 720% damage 2 times on up to 6 enemies in front of you. There is a cooldown of 5 seconds. Combination skill: Advanced Throwing Weapon. Assist skill: Flash Assaulter. (required level: 105) (max level: 10)


 Throwing Weapon: Throw the Great Sword forward, consuming 10 Time Force and hitting up to 6 enemies in its path dealing 450% damage 2 times. [Activation Command] After using Front Slash, press Front Slash once more. Assist skill: Advanced Spin Cutter. (required level: 110) (required skill: level 1 Front Slash) (max level: 10)


 Advanced Throwing Weapon: Enhance Throwing Weapon, increasing its damage to 650% 2 times every 0.3 seconds for 4 seconds and allowing it to push enemies. Assist skill: Advanced Spin Cutter. (required level: 155) (required skill: level 10 Throwing Weapon) (max level: 20)
Combination 3: Turning Drive → Whirl Wind, Advanced Whirl Wind

 Turning Drive: Use the Great Sword’s weight to rotate in a whirlwind, consuming 11 Time Force and dealing 840% damage 2 times on up to 6 enemies while pulling them towards you. Combination skill: Advanced Throwing Weapon. Assist skill: Advanced Rolling Curve. (required level: 115) (max level: 20)

 Whirl Wind: Spin like a whirlwind, consuming 10 Time Force every second and dealing 260% damage on up to 6 enemies every 0.1 seconds for up to 5 seconds. [Activation Command] After using Turning Drive, press Turning Drive once more. Assist skill: Advanced Rolling Assaulter. (required level: 125) (required skill: level 1 Turning Drive) (max level: 20)

 Advanced Whirl Wind: Enhance Whirl Wind, increasing its damage to 440%, duration to 7 seconds, and allowing it to pull enemies towards Beta. Assist skill: Advanced Rolling Assaulter. (required level: 165) (required skill: level 20 Whirl Wind) (max level: 30)
Combination 4: Giga Crash → Jumping Crash → Earth Break, Advanced Earth Break

 Giga Crash: Smash the Great Sword down in front of Beta, consuming 17 Time Force dealing 810% damage 2 times on up to 6 enemies. There is a cooldown of 15 seconds. Combination skill: Jumping Crash. Assist skill: Wind Cutter. (required level: 135) (max level: 10)

 Jumping Crash: Jump into the air then slam the Great Sword down, consuming 20 Time Force dealing 720% damage 2 times on up to 6 enemies. Afterwards, a shock wave will be created, dealing an additional 720% damage on up to 6 enemies. [Activation Command] After using Giga Crash, press Giga Crash once more. Combination skill:Advanced Earth Break. Assist skill: Wind Strike. (required level: 140) (required skill: level 1 Giga Crash) (max level: 10)

 Earth Break: Jump into the air and split the ground below with the Great Sword, consuming 25 Time Force and dealing 810% damage 3 times on up to 6 enemies. Afterwards, a shock wave will be created, dealing an extra 810% damage 3 times on up to 6 enemies. Assist skill: Advanced Storm Break. (required level: 145) (required skill: level 1 Jumping Crash) (max level: 20)


 Advanced Earth Break: Enhance Earth Break, increasing its damage to 1020% 4 times with a 20% chance of instant death. In addition, the shock wave’s damage will be increased to 1020% damage 3 times and an electric field will be created that deals 400% damage on up to 6 enemies every second for 5 seconds. Assist skill: Advanced Storm Break. (required level: 170) (required skill: level 20 Earth Break) (max level: 30)
Thanks to Locked of Southperry for the skill icons and effects!

The Mirror World has been added! The Mirror World is a different version of Maple World, created by the Black Magician to trap Zero. Although it looks very similar, some things are very different in Mirror World!
Only Zero can enter the Mirror World, and each area can be accessed through Zero’s Temple in the center. The different towns within the Mirror World are:
- Henesys
- Edelstein
- Ariant
- Mu Lung
- Leafre
- Ludibrium
- Shadow Village
- Magatia
- Critias
- Temple of Time

Zero’s Temple contains everything you will need! Lagoon is a beauty specialist, Cho is the storage helper, Sel is the salesman, and Dello allows Zero to level up profession skills and personality traits.
Starting from level 100, Zero must travel to each of the different towns and collect the Tears of the Goddess in order to regain Rhinne’s strength so they can return to Maple World!
Each town will have sets of dungeons which are paramount for Zero to level up and complete quests. They are premium hunting areas, the monsters will drop potions and you will receive Weapon Points as well as experience upon completion.
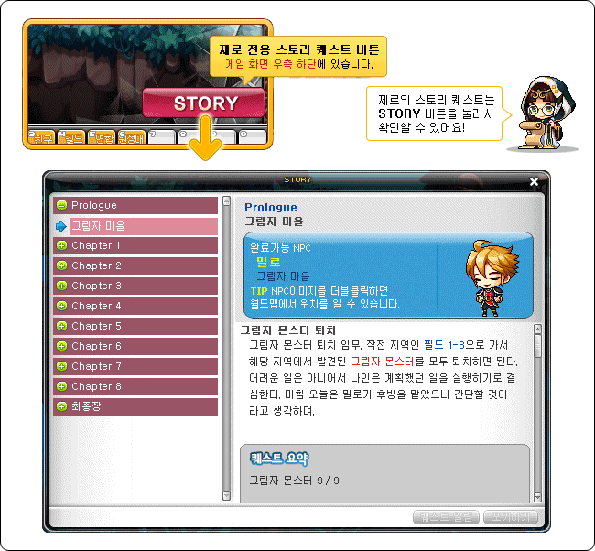
Zero has a special Story system, which is basically an upgraded quest system. All the quests are seperated into 10 chapters and you can go further in each chapter every 2 levels.
The Story button will always be present on the bottom right of your screen, and you can open it to see your progress.

To get to the other side of the mirror, Maple World, you’ll need to defeat the Black Mage’s commander Will and regain all of Rhinne’s strength!
You can actually go there whenever but you will appear faded and you will not be able to gain experience from anything until you are done the storyline at level 180.

On July 20, there will be a Hot Time! Everyone that is logged on at 2:30PM will receive a box that contains the following:
- 90% RED Weapon Scroll (based on your job, gives 9 attack/magic attack and 3 all stats, untradeable)
- 100% Revolution Lucky Item Scroll (changes Zero’s weapon into a Revolution set item, tradeable through the account)
- Evolution Storm Growth Potion (instantly levels you up, has no effect if you are above level 180, tradeable through the account)
- Zero Mysterious Capsule (gives a random amount of Weapon Points for Zero, tradeable through the account)
- RED T-Shirt (M/F based on your character’s gender, permanent Cash item)
- RED Paint Bucket (covers all job’s weapons, permanent Cash item)
- 3 RED Flames of Reincarnation
- 10 RED Coins

If you are lucky, your box may contain one of the following!
- Fafnir Weapon Box
- Gold Label Equpment Full Set Gift Box (gives the full Gold Label set)
- RED Celebration Warrior’s Badge (10 all stats, 10 attack and magic attack, tradeable with the Platinum Scissors of Karma)
- RED Celebration Red Wallet (7 all stats, 7 attack and magic attack, tradeable with the Platinum Scissors of Karma)
- Level 140 Weapon Box
- Level 140 Armor Box

The Mysterious Ice Boxes have been updated! Before they had an R on them but now they have an E, and will continue to do so until August 1. It’s basically the same prizes as last time without the Icebars but with Goggles and Tubes, but I’ll list all of them anyways.
- RED Coin
- Equipment Enhancement Scroll
- Mysterious Love Letter
- Potions
- Personality trait items
- Summer Goggles (300 HP and MP, 2 attack and magic attack, expires)
- Summer Goggles (200 HP and MP, 1 attack and magic attack, expires)
- Summer Goggles (100 HP and MP, 1 attack and magic attack, expires)
- Pink Flower Tubes

Next is the Go! Go! Maple Bingo event! It runs until July 31.

As you can guess, it’s basically bingo! You can join 10 times per day and as soon as 3 people are ready to play, the game will begin!
Everyone will receive 25 random numbers from 1~70 on their board, with some golden numbers that are Mission Numbers. Every 10 seconds, a number will be called by Maple Admin and you have to click on it on your board if you have it. You get points for the following:
- Mission number: 200 points
- Regular number: 100 points
- Complete 1 line with Mission numbers: 1000 points
- Complete 1 line with regular numbers: 500 points

At the end of 5 minutes or when someone completes 5 lines, the game will finish and you’ll receive RED Coins based on your rank. 1st place gets 5, 2nd gets 2, and 3rd gets 1.

The Summer Attendance Check event (Season 2) will run from now until July 31. Each day, you must collect 30 Pink Fans from monsters around your level in order to participate!

For each day you participate, you’ll receive prizes~
- 1 day: 10 Power Elixirs
- 3 days: 1 RED Coin
- 5 days: 5 RED Coins
- 7 days: 60% Additional Potential Scroll
- 9 days: 10 RED Coins
- 11 days: 2 Star Equipment Enhancement Scroll
- 14 days: 70 RED Coins

The 2013 Summer Achievements (season 2) event will run from now until July 31.

For each achievement you complete, you’ll receive a title that expires and gives no stats (2 of the achievements give 2 and 5 RED Coins respectively though). In addition, if you complete all 5 achievements, you’ll get a special medal!
- Complete chapter 4 of the Mirror World
- Get 1st place in Maple Bingo 5 times
- Receive the RED Hot Time box 1 time
- Open 20 Mysterious Ice Boxes
- Complete 5 days of the Summer Attendance Check
The Red Summer Within medal gives 7 to all stats, 175 HP and MP, and 5 attack and magic attack. The stats will expire though…

The last event is the Beginning Zero! event and it runs until August 18.

For every chapter of the Mirror World story you complete, you’ll receive RED Coins! And if you complete Chapter 8, you’ll receive the Zero Gratias Ring which gives 3 to all stats, 300 HP and MP, and 3 attack and magic attack.
- Chapter 1: 5 RED Coins
- Chapter 2: 10 RED Coins
- Chapter 3: 15 RED Coins
- Chapter 4: 22 RED Coins
- Chapter 5: 38 RED Coins
- Chapter 6: 70 RED Coins
- Chapter 7: 120 RED Coins
- Chapter 8: 220 RED Coins
That’s a whopping total of 500 RED Coins!

Let’s move on to the Cash updates! First of all, the RED Royal Hair Coupon has been released for 7900 Cash (wow that’s a lot). It will be sold until July 28.

The RED Royal Face Coupon costs 3500 Cash and will be sold until July 28 as well.

The Pandora’s Box special items have been updated They now include new Scarlet accessories (which are Lucky items and can fill in for any item in a set, with great stats to boot), the Eternal Flame of Reincarnation, the new Magnus and Black Slime boss Souls, and Revolution equipment.

The Epi’s Box has also had its special items updated, including the Giant Rooster mount (permanent), Von Bon’s Rage chair, and advanced scrolls.

A new pet, the Dog Days’ Von Bon pet has been released, and you can buy his package for 8900 Cash until July 28.

Finally, the Child of God package has been released for 14900 Cash and will be sold until July 31. It comes with a hat, overall, shoes, weapon and cape. There are male and female versions of the package (with the two different overalls and Lazuli cape for males, Lapis cape for females). However, if you buy the package on a Zero, you’ll receive the other package for free so you can dress both Alpha and Beta easily!